My blog provides an opportunity to discuss matters which relate to wildlife photography and the posts contain my personal views. From time to time I include posts about particular wildlife habitats which I visit and the photographic opportunities they present. Also the posts sometimes include links to the websites of companies which I personally favour and I would emphasise that whereas I appreciate their products I have no commercial connection with any of them.
Please feel free to add your comments in the ‘Post Comment’ section at the end of each of the posts. Your observations and opinions will be most welcome.
I should add that I have updated this website to a new format and I have been unable to transfer previous comments to accompany the blog posts from my old website.
In the posts below if you click on an image an enlarged photograph is shown in a light box and hovering the mouse over the image will show the image title.

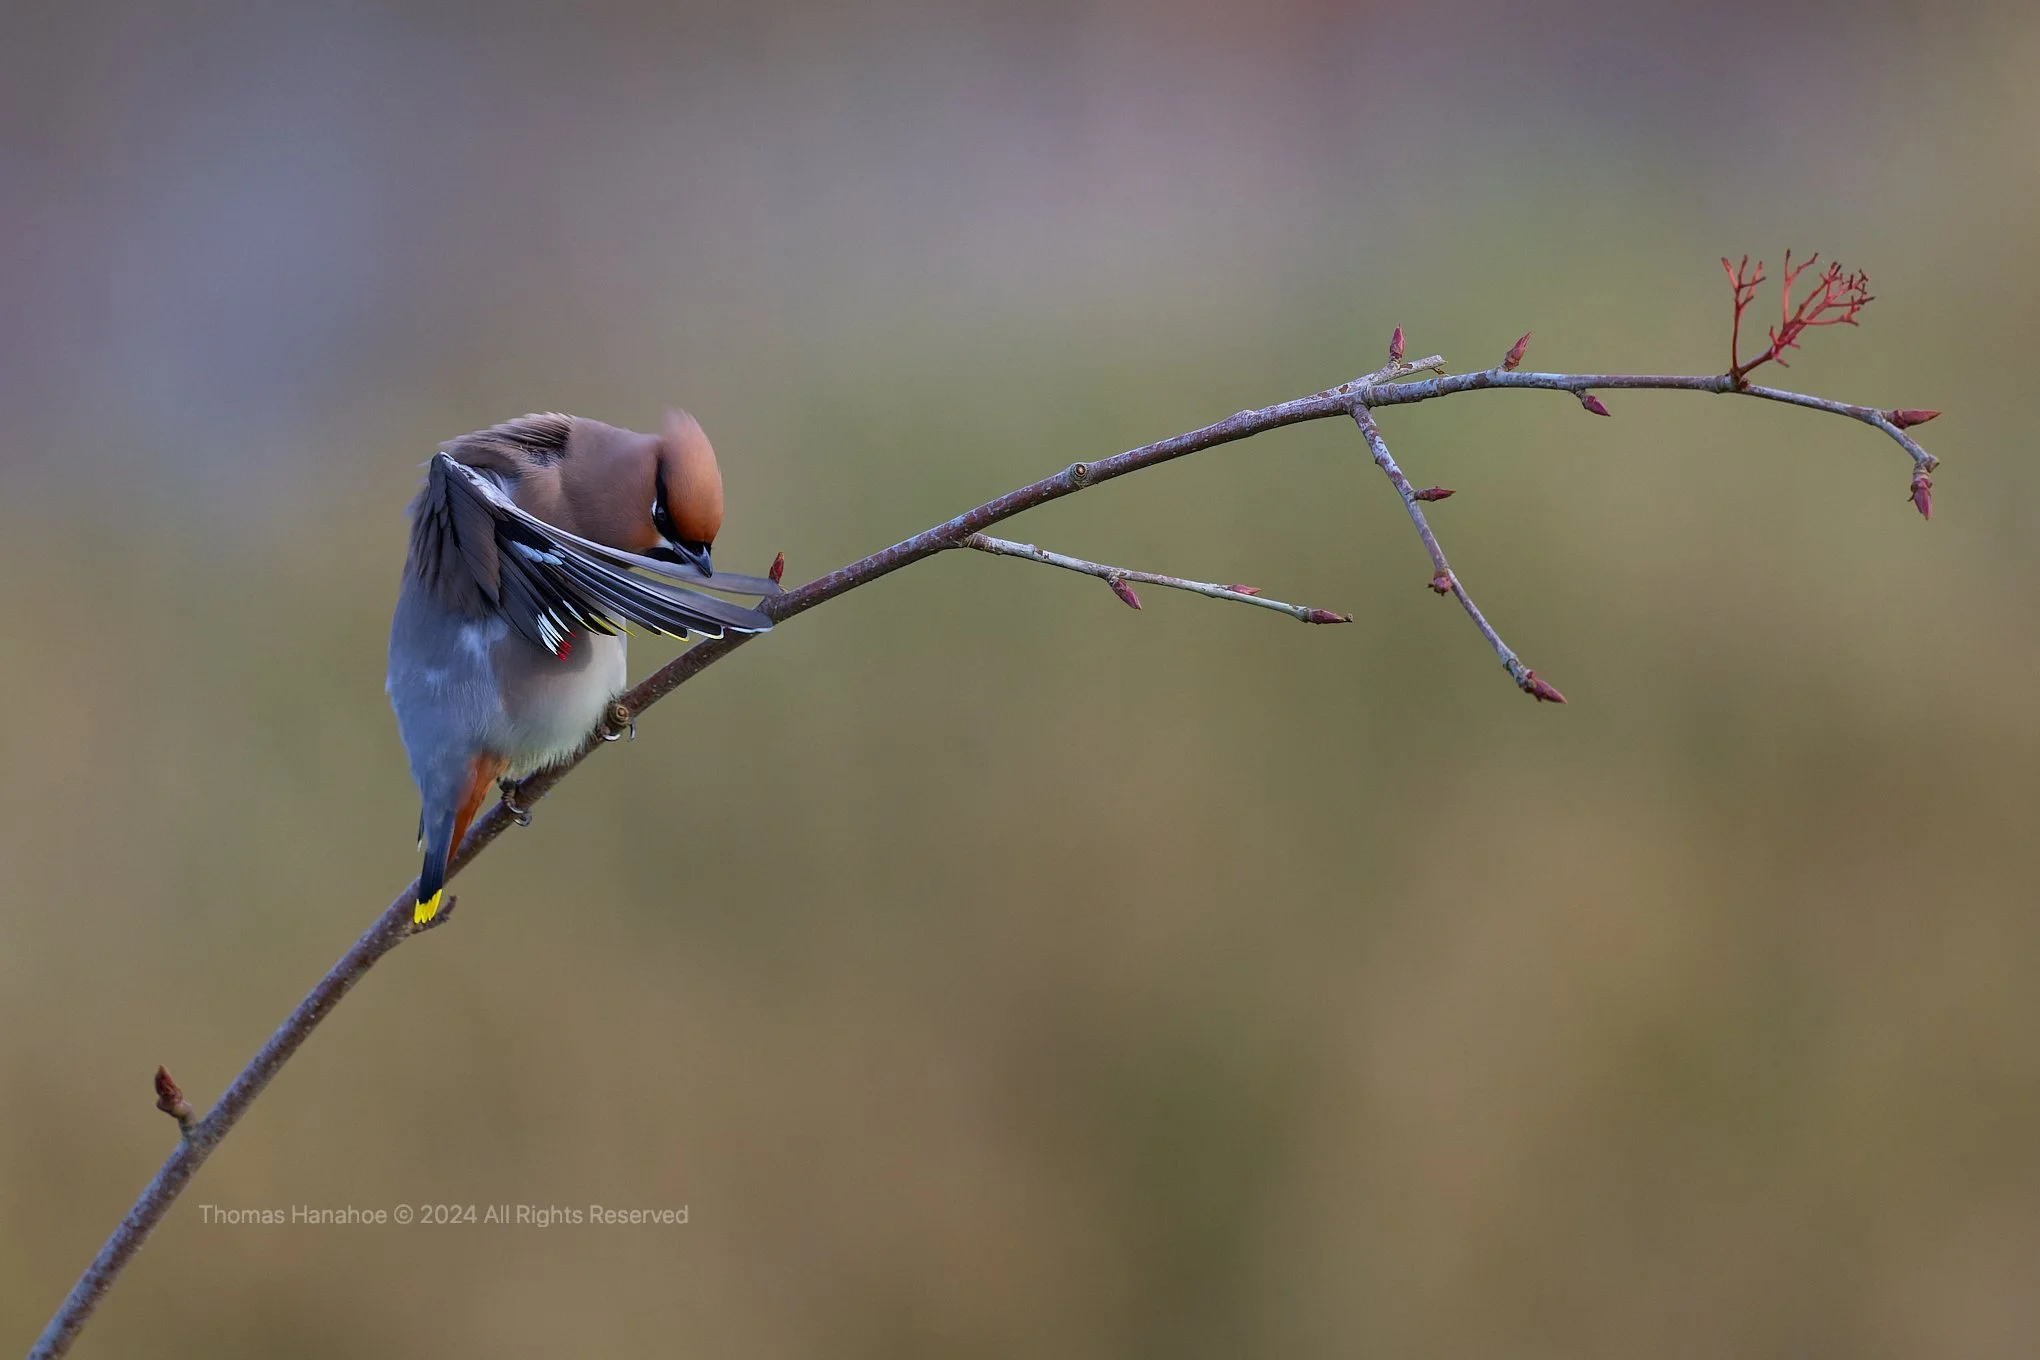
Waxwings at Corby
Waxwings are visitors to the British Isles during winter months, arriving from October until April. Numbers and dates vary annually and in some winters few birds appear but in others thousands arrive. They breed in the northern boreal forests of Scandinavia and Russia and if the annual crop of berries is low they will fly south to new feeding grounds in Britain and other European countries. Usually, most of the waxwings which come to Britain are found in Scotland. If there is an influx from Scandinavia, the quantity and variety of the available berries attract the birds and flocks of over 1000 have been recorded in the Aberdeen area. However, significant numbers have not arrived since 2016-2017 and before that the previous large arrival was in 2012-2013.
The birds are impressive: with a large crest, black eye liner, bright flashes of yellow on the tips of their tail feathers and red flashes to the tips of their secondary wing feathers, they are generally considered to be one of the most beautiful birds seen in the British Isles. Their striking plumage, distinctive call and confiding nature, feeding on berries in urban areas, make watching and photographing them a memorable experience.
In late 2023 flocks of over 500 waxwings were reported in Scotland and by November the largest group seen in England was 60 birds in North Yorkshire, with sightings as far south as Essex. In January 2024 I was delighted to be able to photograph a small group of waxwings in Corby in Northamptonshire where they were feeding on rowen berries.


North Uist
North Uist is an Island in the Outer Hebrides / Western Isles of Scotland. It has mountains, moorlands and pristine white beaches as well as a wide range of wildlife. Perhaps most impressive, it has the superb machair which is a grassland area alongside the western coastline which consists of extensive natural and ancient meadow covered with wild flowers: it supports many species of birds and it is beautiful.
I spent a very enjoyable week on North Uist in early June 2023 and displayed below are some of the photographs from the trip.


Svalbard 2
A visit to Svalbard in 2018 (Svalbard Blog) was fabulous and unfortunately a much anticipated return to the Arctic was delayed by the covid pandemic. When international flights again became available I booked a second trip for July 2022, this time with the Norwegian company WildPhoto on the refurbished icebreaker boat MS Virgo which accommodates up to twelve passengers. Despite the SAS airline pilots’ strike I arrived on the due date in the town of Longyearbyen in Svalbard and photographs of this frontier outpost taken from the aeroplane window and of MS Virgo anchored in a fjord in north east Svalbard are shown below.
In July 2018 the Wahlenbergenfjorden in north east Svalbard was completely covered with thick sea-ice but in July 2022 there was little or no sea- ice in the fjord. In consequence we decided to head north in MS Virgo and the found sea-ice, including large pieces of blue glacier ice, about 100 miles north of Svalbard. And although there were polar bears in the sea-ice, without a land mass it was difficult to locate them in goodly numbers and we decided to return south back to Svalbard. Whereas some bears had travelled north with the ice others had opted to stay on Svalbard and in light of this the numbers of bears on Svalbard in July 2022 were reduced compared to those encountered in July 2018.
It was evidently clear that the arctic glaciers are melting rapidly. Often they emitted deep rumbling sounds like loud thunder, frequently followed by massive pieces of ice falling from the face of the glacier into the ocean and creating huge waves. A photograph, taken from a zodiac skiff launched from MS Virgo shows this action taking place (click the photo to see the full portrait mode picture).
Birds such as Brunnich’s guillemots were widespread and particularly so on the bird cliffs of Alkerfjellet where they congregate in the tens of thousands. Also black guillemots with their beautiful red legs, Arctic Skuas and arctic terns as well as kittiwakes and glaucous gulls were all abundant.
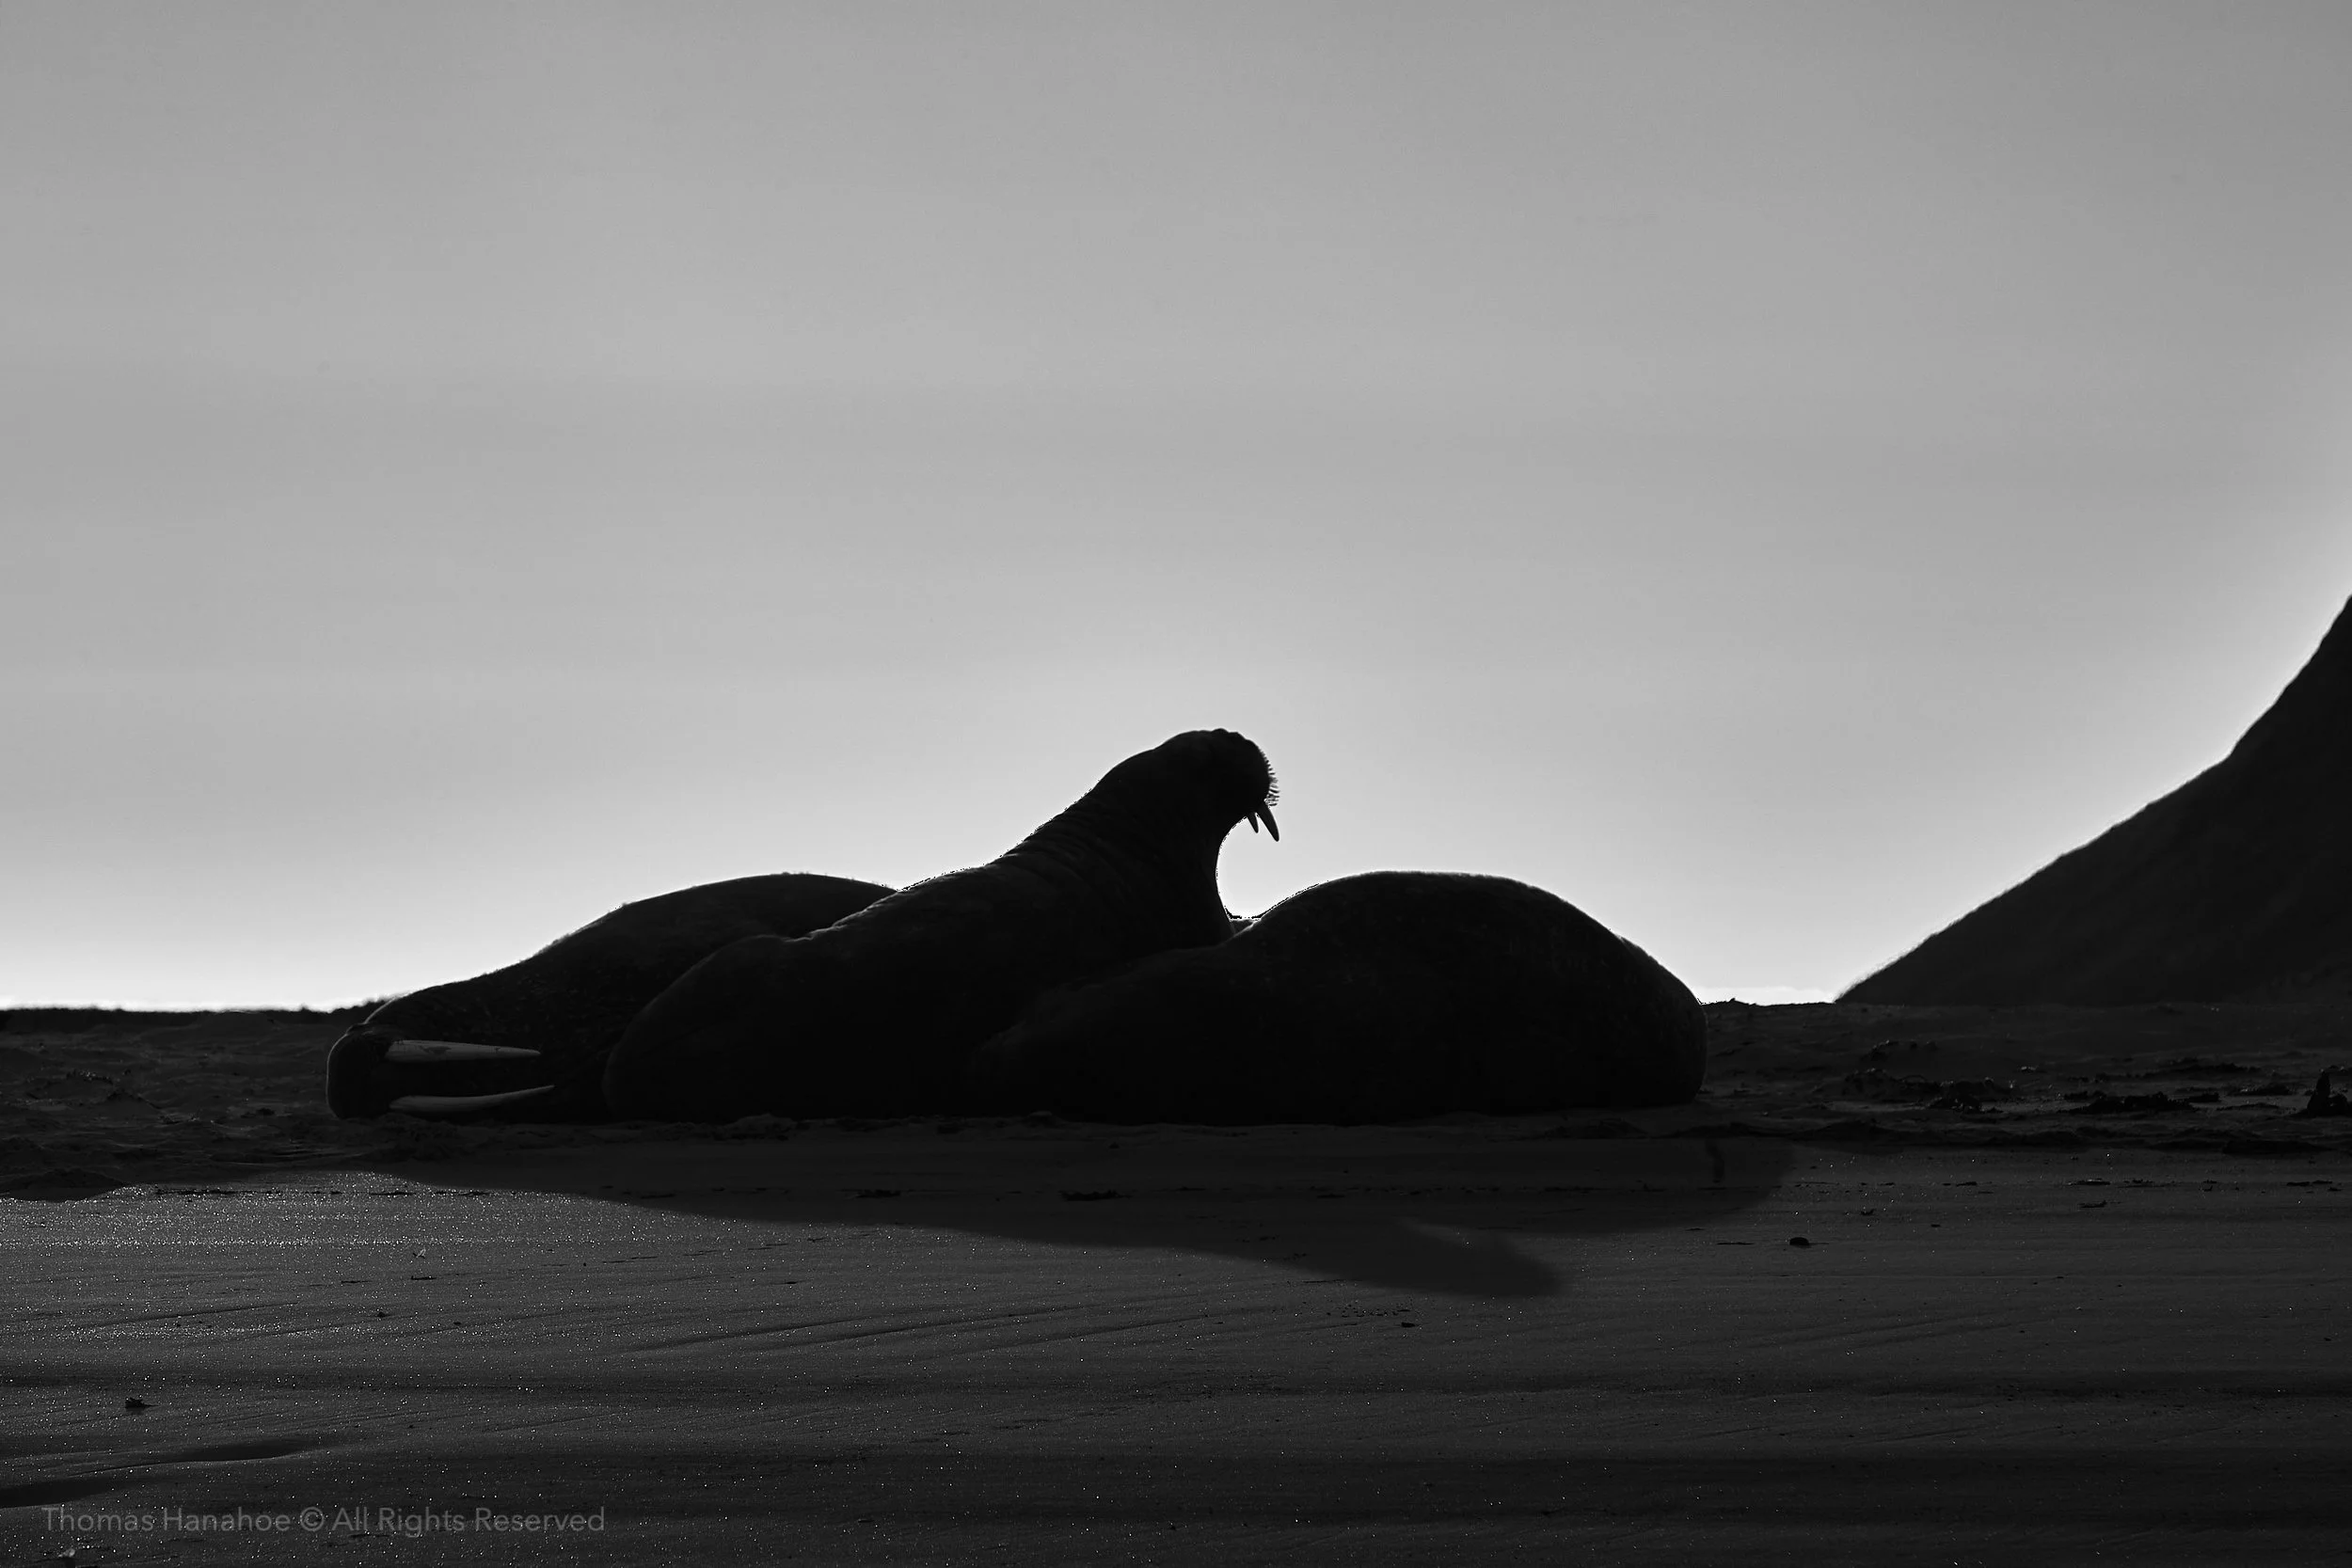
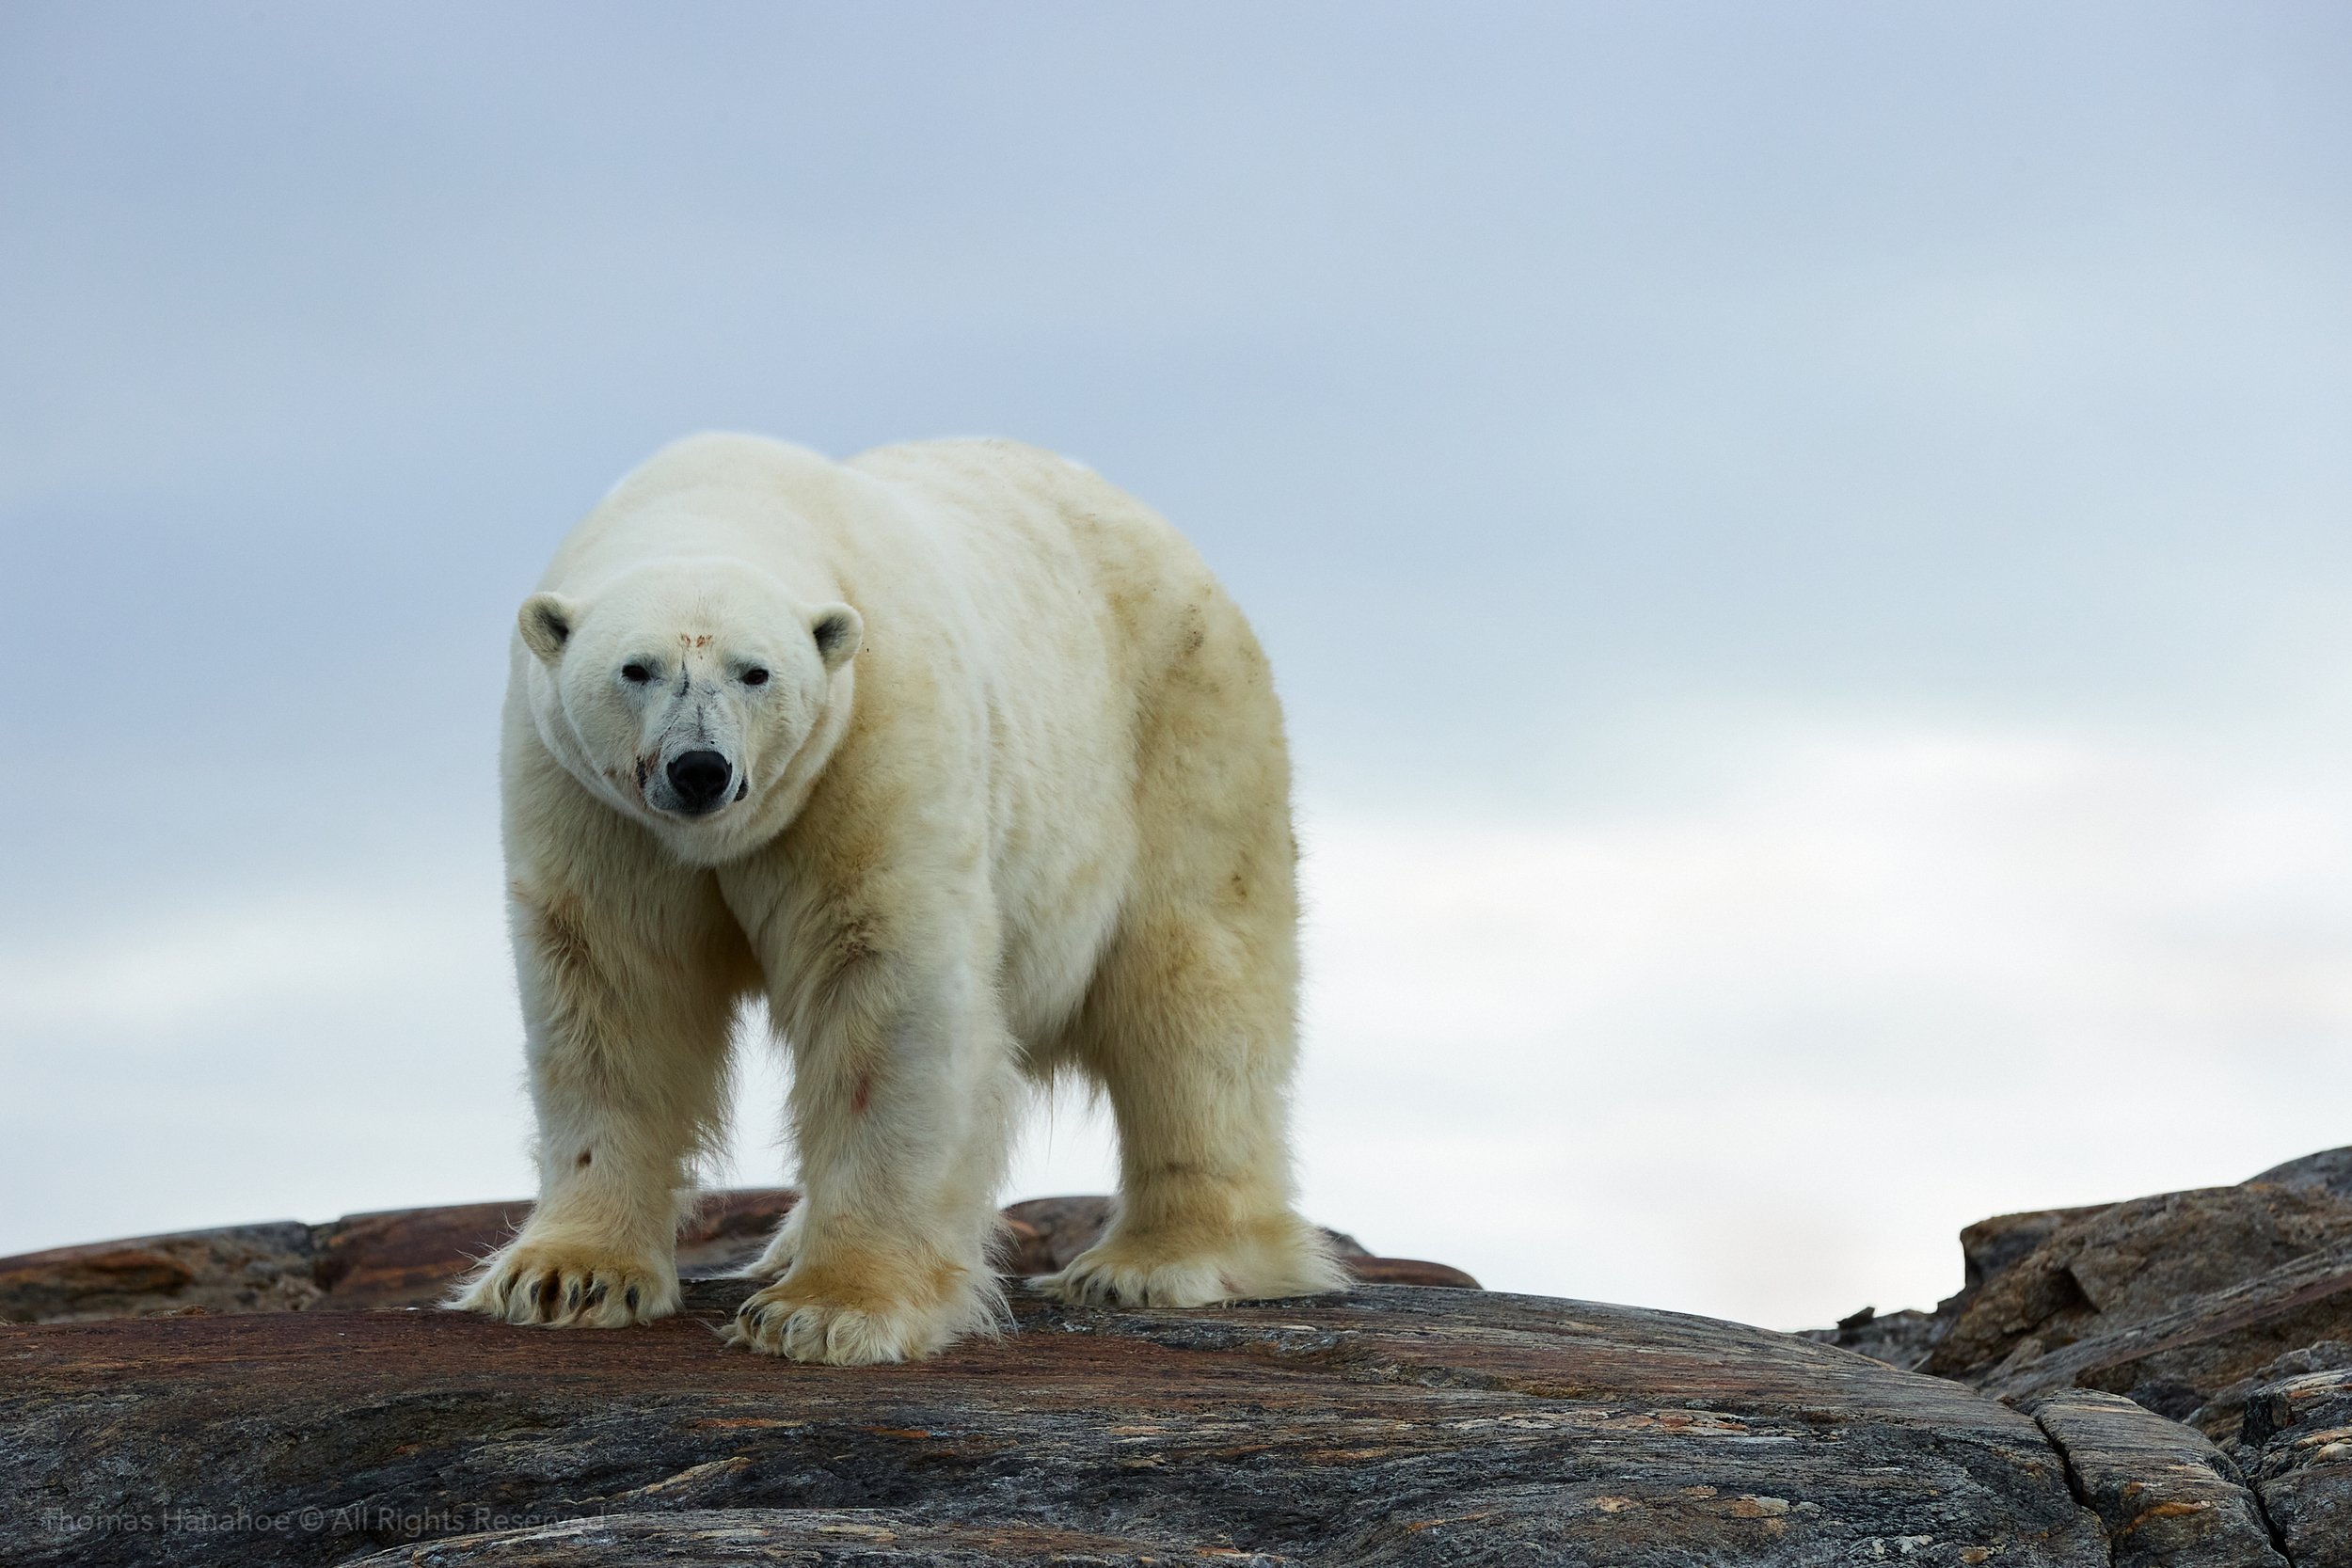
Charismatic arctic foxes entertained us as they scrambled over rocks and mountainside. Large colonies of walruses, hauled out of the ocean onto rocks exposed at low tide were great to see and of course the polar bears were as curious as ever, always coming to check us out as we approached.
Again it was a first class experience. it was wonderful to be back in the Arctic with great guides and crew accompanied by twenty-four hour daylight, the polar bears, soft light, and wonderful photographic opportunities.
For how long this remains the case will depend significantly on the consequences of global warming.


Climate Change & People
Not for the first time of late, Bedfordshire has recently experienced a period of exceptionally hot weather while elsewhere in the UK there was flooding.
Thoughts turn to population growth and climate change.
The United Nations estimates that the world population of people is 7.7 billion. In 1950, five years after it was founded, United Nations estimated world population at around 2.6 billion people: it reached 5 billion in 1987 and 6 billion in 1999. In October 2011 the estimate was 7 billion. A global movement "7 Billion Actions" was launched to mark this milestone. The world’s population is expected to increase by 2 billion persons in the next 30 years, from 7.7 billion currently to 9.7 billion in 2050 and could peak at nearly 11 billion around 2100. It is worth noting that (https://en.wikipedia.org/wiki/World_population) in the year 1800 the earth’s estimated human population was 1.0 billion and in 1900 it was 1.7 billion people.
Across the world economic growth trumps every other policy of government with an objective that each year the gross domestic product should be greater than that of the previous year. Perhaps this should now change so the natural environment is brought to the fore with a focus on climate change and how many people Earth is able to support without driving other species to extinction.
There is no doubt about the current impact of the human race on the Earth. All the data below have been taken directly from the websites of the Met Office (https://www.metoffice.gov.uk/weather/climate-change/what-is-climate-changehttps://www.metoffice.gov.uk/weather/climate-change/what-is-climate-change) and and NASA (USA National Aeronautics and Space Administration: https://climate.nasa.gov}.
The UK Met Office says: In the 11,000 years before the Industrial Revolution, the average temperature across the world was stable at around 14°C. The Industrial Revolution began in the mid-1800s when humans began to burn fossil fuels such as coal, oil, and gas for fuel. Burning fossil fuels produces energy, but also releases greenhouse gases such as carbon dioxide, methane, and nitrous monoxide into the air. Over time, large quantities of these gases have built up in the atmosphere. For example, the level of carbon dioxide in the atmosphere rose by 40% during the 20th and 21st century and is now over 400 parts per million (ppm). This level of carbon dioxide is higher than at any time in the past 800,000 years.
The Met Office also provides convincing evidence that the UK average temperature is increasing as displayed below:

This image shows that the five warmest years have all occurred since 2006. Cooler years are blue, while warmer years are red.
In the USA, NASA gives detailed and extensive evidence about climate change on its website. It states that “Scientific evidence for warming of the climate system is unequivocal” (https://climate.nasa.gov/evidence/) and asks the following question: Climate change: how do we know?

This graph, based on the comparison of atmospheric samples contained in ice cores and more recent direct measurements, provides evidence that atmospheric CO2 has increased since the Industrial Revolution. (Credit: Luthi, D., et al.. 2008; Etheridge, D.M., et al. 2010; Vostok ice core data/J.R. Petit et al.; NOAA Mauna Loa CO2 record.)
NASA emphasises that the Earth's climate has changed throughout history: Just in the last 650,000 years there have been seven cycles of glacial advance and retreat, with the abrupt end of the last ice age about 7,000 years ago marking the beginning of the modern climate era — and of human civilization. Most of these climate changes are attributed to very small variations in Earth’s orbit that change the amount of solar energy our planet receives. The current warming trend is of particular significance because most of it is extremely likely (greater than 95 percent probability) to be the result of human activity since the mid-20th century and proceeding at a rate that is unprecedented over decades to millennia (Reference 1). Earth-orbiting satellites and other technological advances have enabled scientists to see the big picture, collecting many different types of information about our planet and its climate on a global scale. This body of data, collected over many years, reveals the signals of a changing climate. The heat-trapping nature of carbon dioxide and other gases was demonstrated in the mid-19th century (Reference 2). Their ability to affect the transfer of infrared energy through the atmosphere is the scientific basis of many instruments flown by NASA. There is no question that increased levels of greenhouse gases must cause the Earth to warm in response. Ice cores drawn from Greenland, Antarctica, and tropical mountain glaciers show that the Earth’s climate responds to changes in greenhouse gas levels. Ancient evidence can also be found in tree rings, ocean sediments, coral reefs, and layers of sedimentary rocks. This ancient, or paleoclimate, evidence reveals that current warming is occurring roughly ten times faster than the average rate of ice-age-recovery warming (Reference 3).
NASA also provides information about the Vital Signs of climate change with respect to Carbon Dioxide, Global Temperature, Arctic Sea-Ice Minimum, Ice Sheets and Sea Level.
For example, Arctic Sea-Ice Minimum (https://climate.nasa.gov/vital-signs/arctic-sea-ice/) indicates that the Arctic sea-ice reaches its minimum each September. September Arctic sea-ice is now declining at a rate of 12.8 percent per decade, relative to the 1981 to 2010 average. The graph below shows the average monthly Arctic sea-ice extent each September since 1979, derived from satellite observations.

AVERAGE SEPTEMBER EXTENT RATE OF CHANGE: Data source: Satellite observations. Credit: /NASA 12.8 % per decade.
The data from NASA satellites, presently circulating the Earth, show the international nature of climate change. Further, the information from the Met Office relating to the UK annual temperature demonstrates the local impact of climate change. Furthermore, the recent increase in atmospheric CO2 levels correlates clearly with the industrial revolution and the exponential growth of the human race.
There is little doubt that Earth and its natural world will survive climate change but the human species may not and, if we do, the consequence will likely be a very different world to the one we now know.
The Covid-19 pandemic has provided an opportunity for many people to consider how they interact with their environments. In England schools will soon welcome back their pupils and as we move towards the end of the lockdown period many of us look forward to the realisation of a new normality.
References
IPCC Fifth Assessment Report, Summary for Policymakers: https://www.ipcc.ch/site/assets/uploads/2018/02/AR5_SYR_FINAL_SPM.pdf
B.D. Santer et.al., “A search for human influences on the thermal structure of the atmosphere,” Nature vol 382, 4 July 1996, 39-46
Gabriele C. Hegerl, “Detecting Greenhouse-Gas-Induced Climate Change with an Optimal Fingerprint Method,” Journal of Climate, v. 9, October 1996, 2281-2306V. Ramaswamy et.al., “Anthropogenic and Natural Influences in the Evolution of Lower Stratospheric Cooling,” Science 311 (24 February 2006), 1138-1141
B.D. Santer et.al., “Contributions of Anthropogenic and Natural Forcing to Recent Tropopause Height Changes,” Science vol. 301 (25 July 2003), 479-483.
In the 1860s, physicist John Tyndall recognized the Earth's natural greenhouse effect and suggested that slight changes in the atmospheric composition could bring about climatic variations. In 1896, a seminal paper by Swedish scientist Svante Arrhenius first predicted that changes in the levels of carbon dioxide in the atmosphere could substantially alter the surface temperature through the greenhouse effect.
National Research Council (NRC), 2006. Surface Temperature Reconstructions For the Last 2,000 Years. National Academy Press, Washington, D.C.
A Week On Skolkholm
Skokholm Island lies about three miles from the Pembrokeshire coast in South Wales. It’s approximately one mile long and half a mile wide with beautiful red sandstone cliffs. It was the first Bird Observatory in Great Britain and is a Site of Special Scientific Interest and a National Nature Reserve managed by Resident Wardens Giselle Eagle and Richard Brown on behalf of the Wildlife Trust of South & West Wales.
There are no cars on Skokholm only a dumper truck used by Richard and Giselle to meet the boat arriving from Martin’s Haven, near Marloes on the Pembrokeshire coast. The accommodation is basic and powered by solar panels. Residents bring their own bedding and food and there is a small stock of items on the island just in case the return boat is cancelled because of bad weather.
All the gear needed for the week needs to be carried from the shore at Martin’s Haven to the jetty to meet the boat. There is a lot of gear. As well as the usual range of clothing and photographic equipment, it is surprising how much food is required to feed one person for a week! The gear is lined up on the rocks leading down to the jetty and a human chain is formed to pass all the boxes and bags down to the boat. On arrival at Skokholm, while Richard transports the luggage in the dumper truck, Giselle and assistants are waiting with coffee and chocolate biscuits. What could be better?
Skokholm is a superb wildlife haven with thousands of seabirds such as puffins, guillemots, razorbills, manx shearwaters and storm petrels, accompanied by inter alia oystercatchers, chough, skylark and wheatear as well as predators such as black-backed gulls. The puffins arrive on Skolkholm in April and return to the sea with their new chicks in mid July. I was there for a week in mid June 2019.
The puffins nest in burrows with a single chick. The parents take it in turns to fish for sandeels and from daybreak to dusk the cliffs are alive with puffins flying like fighter planes back and forth skilfully avoiding the predatory gulls which attempt to steal their catch as they return to the nest. The puffins rely on speed to escape the gulls and will often dart into the safety of the burrow with a gull chasing inches behind.
Each morning I chose a location at The Neck on the east of the island so that I might capture the birds as they returned from the sea, backlit by the sun illuminating their spectacular orange feet. It was great fun.
In the afternoon I walked the numerous paths of the Island to photograph the various passerines which live alongside the rabbits in the rich undergrowth and in the old stone walls which populate many parts of the Island.
There are thousands of razorbills on Skokholm and they look spectacular against the red sandstone of the cliffs where they make their nests.
Skokholm is an isolated place away from much of the paraphernalia of modern living. As well as providing wonderful opportunities for wildlife photography, a week on the Island is a great experience. I recommend it wholeheartedly.


A Few Days In Norfolk
Towards the end of January 2019, over the spring tide period, I spent a few days on the north Norfolk coast and each morning visited RSPB Snettisham for the wader roost. arriving before dawn ready to photograph the birds at first light. Then later, refreshed by, I was spoilt for choice by the numerous other superb wildlife locations around the Hunstanton area.
The weather was poor; dank, dark, dismal and dull. But it was a good break which I much enjoyed.
The first photograph below shows the knot at the RSPB reserve at Snettisham assembling into a large flock as the flood tide drives them from their feeding grounds in the mudflats of The Wash. The flooding sea can be seen in the background and the sandy beach is lit by the low dawn sun.
As the tide approaches high water, the knot come ashore to roost alongside the banks of the man-made freshwater lagoons formed from gravel pits close to the beach and where the birds gather in huge flocks to wait for the tide to ebb. From time to time they take off suddenly: sometimes it’s caused by a raptor overhead but on other occasions it appears seemingly without cause. Whatever the reason, the sight of so many birds moving in unison and the sounds made by their synchronised wings provide an unforgettable wildlife experience.
When the tide begins to ebb and the mud is again uncovered, the knot begin to leave the gravel pits in order to return to their feeding grounds. They usually go in dribs and drabs with relatively small numbers leaving together, rather than lifting off all together as a single flock.
On one of the mornings as I left the beach area with the ebb tide well underway, I stopped to take the picture below which shows the mud being exposed by the regressing sea water, the small temporary rivers that result and with some of the birds that have left the pits beginning again to feed.
On one of the mornings as I left the beach area with the ebb tide well underway, I stopped to take the picture below which shows the mud being exposed by the regressing sea water, the small temporary rivers that result and which provide for some of the other birds that have left the pits, such as little egrets and bar-tailed godwits, enabling them again to feed.
The land around Hunstanton is mainly a farming area and there are many birds which feed on the rich agricultural soil including the beautiful red-legged partridge shown below.
A little south and east of Hunstanton near to Fakenham the Hawk and Owl Trust nature reserve at Sculthorpe Moor is home to numerous raptors as well as woodland birds including the bullfinch which can be photographed high in the trees from an elevated hide as it comes to join a wide range of other species making good use of the bird feeders in the bad weather.
The north Norfolk coast is a great wildlife location which is often full of surprises. It rarely disappoints.


Shorties at Burwell
Over the last month or so (November 2018) I have made three trips to Burwell Fen in Cambridgeshire. It’s a flat landscape not far from the River Cam, wild with a significant amount of fallow land in an area famous for its drains and dykes: the kind of landscape which harbours a large number of small mammals and is highly attractive to owls and other birds of prey.
My first visit was on a beautiful sunny afternoon towards the end of November with soft winter light and still air. Four short eared owls appeared at about 1:30pm and they were still hunting when I left at sunset. They were a magnificent sight against the low evening sun which highlighted their bright yellow eyes with their wings often backlit as the birds quartered the fields hunting for voles amongst the grasses and reeds.
On my second trip the shorties were in the air but they remained some distance away and were too far for me to photograph.
Again on my third trip the owls were present, mainly in the distance but occasionally passing closely by. However, the highlight of the afternoon was a kestrel which for about five minutes perched on a nearby fence post. I walked progressively towards the post, taking photographs and she remained quite still, watching me all the time. I walked to within about ten metres of her and had a wonderful view of this most handsome bird of prey.
If you like birds of prey, Burwell Fen is a great place to visit.


Dance On The Beach
A beautiful morning in Norfolk: the high tide had been early and before dawn all the wading birds had been washed off the mud by the incoming flood. In the early morning light they gathered to roost in huge flocks along the beach at Snettisham, waiting for the tide to ebb. Occasionally, and often as a raptor appeared, they took to the air and danced in unison forming swirling clouds of rapidly beating wings. As they swirled the flocks twisted and turned revealing alternatively their light breasts and darker backs. As always, the sights and sounds were spectacular.
Knot dance over a beach as they prepare to roost
Wind in the Woods: Red Squirrels and Autumn Leaves
In October 2018 I spent a few days in the Cairngorms in Scotland and as part of the trip had a day with red squirrels in the forest. The day was windy and this added to the entertainment provided by the reds’ antics. This short video attempts to capture the atmosphere and mood of the autumn forest along with the skills of the mischievous squirrels.
Mountain River: fast water & clean rocks
The Cairngorms in Scotland has many beautiful rivers. This video shows a mountain stream surrounded by trees near Glenmore. As the water tumbles rapidly over the rocks and boulders it creates white, turbulent, effervescent water, washing them clean and creating wonderful sounds.
Lakenheath
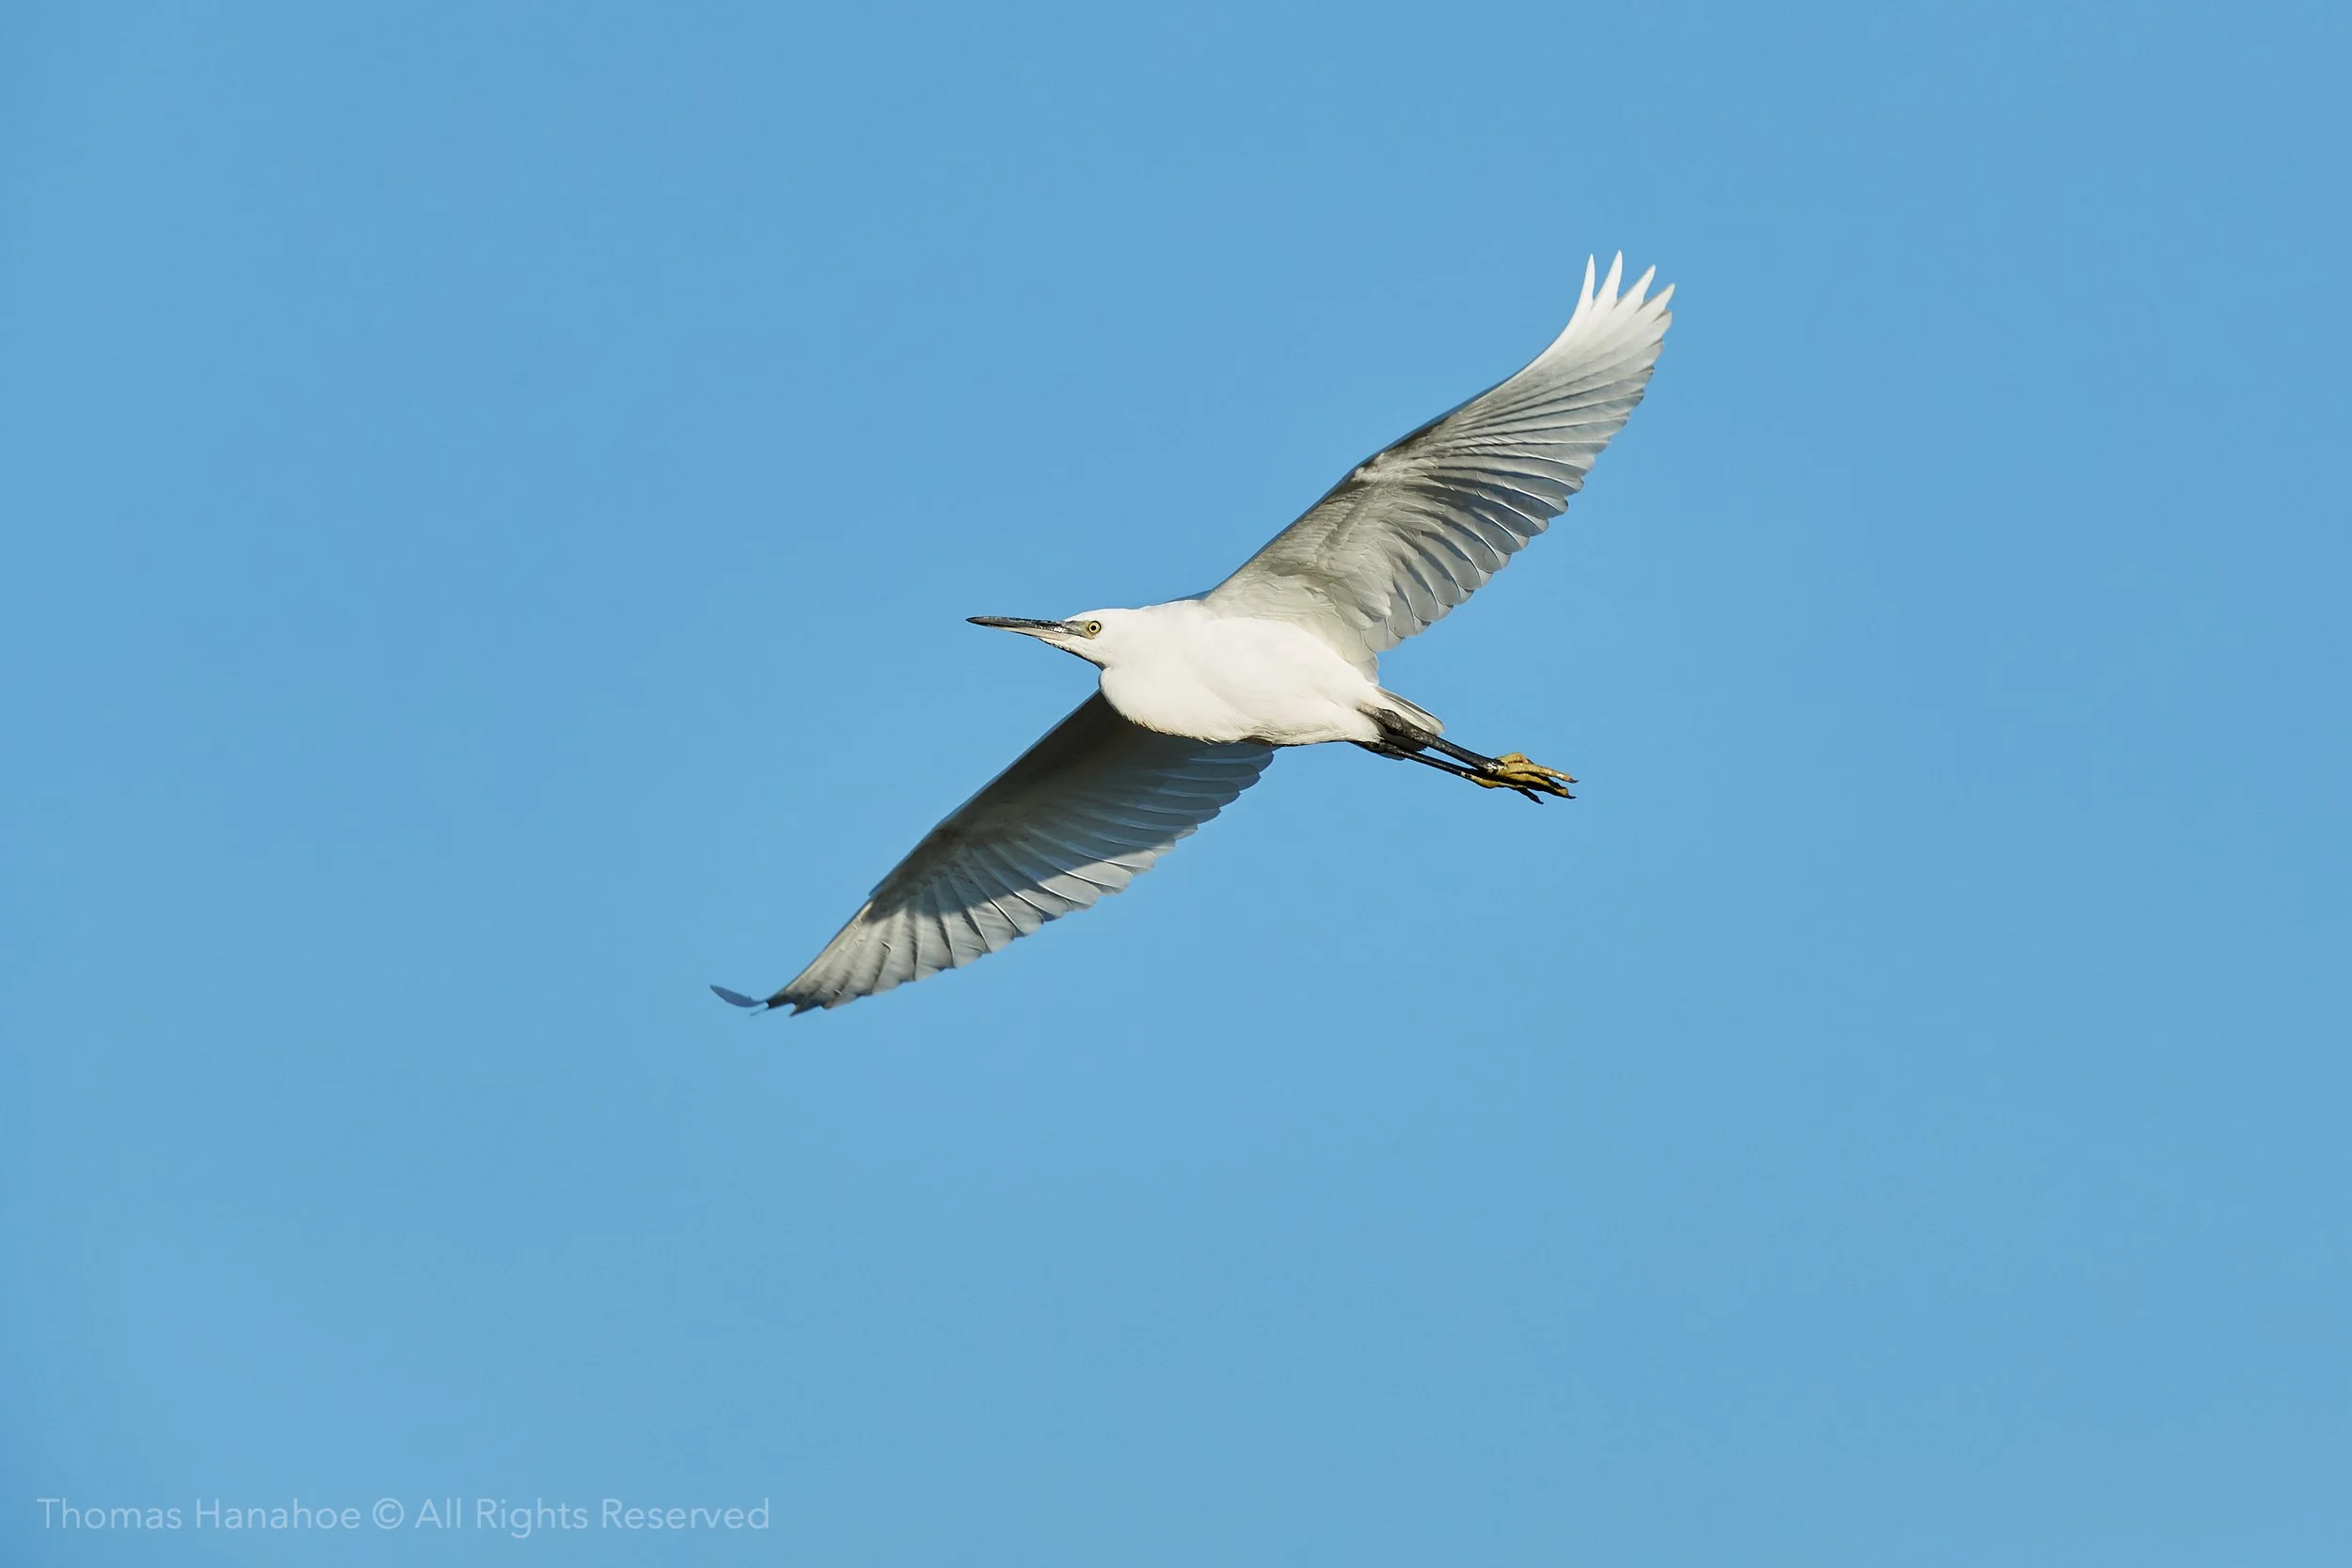
Last week I paid a short visit to Lakenheath in Suffolk. I hadn’t been to this RSPB reserve for a few years but it was a lovely as ever and adorned by ladybirds. It was relatively quiet; few people but also few wildlife species on display. I was however entertained by a little egret feeding in front of the New Fen viewpoint. First the bird stalked small fish with an impressive hit rate.
Later, it danced over the water chasing the numerous dragonflies and while it didn’t catch as many dragonflies as small fish, it did have the occasional success.
At the Mere Hide, a lovely male kingfisher flew to one of the perches which are placed close to the hide. It too caught a small fish before departing to a more distant part of the lake.
I much enjoyed the visit and will return in the not too distant future.


Camera Mode
One of the delights of nature photography is that you’re never quite sure what you are going to see and photograph; and equally, one of the great frustrations of nature photography is……
Suppose you are in a field taking photographs of hares when a marsh harrier flies into view. You take a picture of the bird against a bright sky. If you are shooting in automatic mode (P) or semi-automatic mode (Av or Tv) you will be frustrated with the outcome because, with your camera set up appropriately to take photographs of the hares, the bird will appear very dark, if not black.
So, why does the marsh harrier appear very dark?
Light meters
In order to set the exposure, DSLR cameras use an integrated light meter to measure the reflected light from the objects in the scene which you intend to photograph. The light meter can be seen when you look through the viewfinder. Also, there is often an option so that you can see it with other shooting data on the back screen of the camera. It is composed of a scale which usually extends from -3, through zero, to +3. It has an indicator which moves up and down the scale as the level of light increases or decreases. If you point your camera at a very bright scene the light meter will read about +3 and with a very dark scene it will read about -3. Each unit on the scale represents one stop of light.
A stop of light
A stop of light is a relative value: it has no specific units of measurements. It refers to a change in the amount of light. A change of one stop is equal to altering the amount of light by a factor of two. If you wish to reduce the exposure by one stop you would halve the amount of light striking your camera sensor. If you wish to increase the exposure by one stop you would double the amount of light striking the sensor. For example, to increase the amount of light by one stop, double your camera shutter speed (from say 1/1000 sec to 1/500sec) or double the area of your aperture by reducing the F number of your lens by one unit (from say F5.6 to F4). Alternatively, increase the sensitivity of your sensor by increasing the ISO value by one unit (from say 800 to 1600). Each of these changes would double the amount of light recorded by your camera sensor.
Auto mid grey
When you take a picture in P mode (automatic), Av mode (aperture priority) or Tv mode (shutter speed priority) the camera first makes an assessment of the amount of reflected light in the scene. Then, no matter how light or dark the scene, it adjusts the light levels reflected onto the camera sensor so that the average light level is a mid grey (ie: on the scale of 0 - 255, this gives a luminosity value of 128). This adjustment is usually valid; but not invariably. When you point the camera at a scene with little variation in the reflected light levels (eg all very bright or all very dark) the camera will still automatically set the average light level in the scene to a luminosity of 128. Of course, on a dark day any given scene will be relatively dark and on a bright day it will be relatively bright. But regardless of the actual reflected light levels, the camera will set the average light level of the scene to a mid grey. This ensures that the picture is well illuminated and sensor captures the full range of details in the scene with no areas too bright or too dark.
Black cats and snow
There are two classic examples which show that sometimes the camera gets it wrong. The first is a photograph of a black cat sat on a stack of coal. The whole picture is composed of shades of black. In P, Av or Tv modes both the coal and cat will appear grey. This is because the camera will allocate an average mid grey evaluation to the scene and because all elements of the scene have essentially the same luminosity level, the outcome is a mid grey cat and mid grey coal. The second example is of a winter snow scene. Again the light meter will average the light levels to mid grey and, because all the luminosity levels are about the same, the snow scene will appear in the photograph as mid grey, not snowy white.
The classic way of resolving the “black cat on coal” issue is to use exposure compensation. So, you use the light meter and darken the picture by about one or two stops of light so that the cat and the coal appeared suitably black; and with the snow scene the picture you would brighten the picture by about one or two stops of light so that it appeared appropriately white.
You can do the same with the hares and the harrier: so before you press the shutter to take the picture, use the light meter and turn the wheel on the back of the camera to add about two stops of light. The harrier will then be appropriately exposed.
Manual mode
An alternative approach is to set the camera shooting mode to M (manual exposure). You then choose both the aperture and the shutter speed, as well as the ISO, to determine the exposure. The camera is now suitably set for the amount of reflected light within the scene and the exposure will be set correctly whether you are shooting hares in the field or harriers in the sky.
But how do you determine both the aperture and the shutter speed, as well as the ISO?
You use the light meter.
Using the light meter
First decide on the aperture. You will probably want the background to be out of focus so that the hares stand out in the picture. Consequently, choose the widest aperture (shortest depth of field) available on your lens, say F5.6. Then, point your camera at an object which you know within any given scene, should be mid grey and set the light meter to zero. In an appropriately exposed photograph, green grass has a luminosity of mid grey and I usually use the grass to take a meter reading. But you can use any object as long as you know its relative luminosity. For example, you can point the camera at a clear blue sky and set the light meter to +2. Or, you can point the camera at a dark shadowy object that you know should appear as a black in the photograph and then set the light meter to -2.5. If this meter reading does not give you a shutter speed fast enough to freeze hares chasing each other (say 1/2000sec) then increase the ISO until it does.
Now, when you take an opportunistic picture of a harrier flying overhead, it too will be appropriately exposed.
Relativity
Of course, on a dark day the grass will be relatively dark and on a bright day it will be relatively bright. But compared to the luminosity of the other elements in the scene, the grass will always be mid range. By setting the luminosity of the grass to mid grey, with the light meter showing zero, the scene will be appropriately lit: none of the whites will be blown (ie so bright they are above the recording capacity of the camera sensor) and none of the blacks will be blocked out (ie so dark they are below the recording capacity of the camera sensor).
What’s the downside?
Downside of M mode
You need to keep a constant eye on the light levels. When the sun comes out from behind a cloud the light level suddenly changes and the scene is immediately brighter. The grass will no longer read zero in the light meter and you will need to take another reading and adjust the exposure so that the grass is again set to a meter reading of zero; and you need to keep on doing this as the light levels continually change.
Manual exposure puts you in charge of your camera and gives you an intimate understanding of the way the light is illuminating your scene. And with your DSLR, use the histogram on the back of the camera to ensure that you have not under exposed or over exposed your shot; and to fine tune your exposure.
Metering the light
You can choose the method your light meter uses to measure the light. With Canon cameras you can choose between evaluative, centre weighted, partial or spot metering.
evaluative - measures reflected light levels across the scene to determine an average value
centre weighted - gives priority to the light levels at the centre of the image
partial - uses only the central part of the image to measure the light levels
spot metering - measures the reflected light level at one defined small area of the image.
For other camera users
Nikon: matrix, centre weighted & spot metering
Sony: multi, centre & spot
Panasonic: multizone, centre & spot
With P, Av or Tv shooting modes spot metering is usually a bad idea because it measures the luminosity of about 1% of the scene at the centre of the viewfinder. This may be relatively very bright or very dark compared to the overall luminosity of the picture.
However, if you decide that Manual mode is for you then it is a good idea to use spot metering because other methods such as evaluative metering will give you an average meter reading from a large area of the scene. With spot metering you can point your camera at a very small part of the scene, take a meter reading and then make suitable adjustment. Many DSLRs have a specific option to select the spot metering mode when using manual exposure and some also provide an option to use either the central AF (autofocus) point or the selected AF point to take the reading.

Carrying Big White lenses
Without doubt the weight of camera gear is of significance in nature photography which often involves long periods of carrying the equipment while looking for wildlife. I know a number of photographers who have recently switched from heavy full-frame or APS-C outfits to the smaller, lighter lenses associated with micro four-thirds, mirrorless cameras. However, in my view, while these rigs are really good as yet they do not have the top notch quality of the big white lenses.
I use a wide range of Canon lenses with full frame cameras but my default combination is the Canon EF 500mm f/4L IS II USM lens with a 1.4x converter attached and paired with a Canon 1DX Mk II camera. This usually sits on a Gitzo tripod with a Wimberley gimbal head and together the outfit weighs about 8kg. Even without a camera backpack with additional gear, this is a significant and unwieldy load to lug for long periods of time.
For a number of years my modus operandi has been to carry the outfit as a single unit with the extended tripod over my shoulder so that the camera and lens hung behind me. Since the outfit is very expensive I did this carefully! The advantage was that outfit was quickly available for action. However, occasional shuffling was required to shift the discomfort!
I recently decided a change was in order. As the photograph below shows, I bought a long strap (Black Rapid Sport Breathe) to attach to the lens/camera combination. This has enabled me to remove the combination from the tripod and to carry it diagonally from my left shoulder so that the it rests against my right hip with the lens tripod mount supported in my right hand. The strap has a thick shoulder pad which spreads the burden and some of the weight is in my hand. I carry the tripod and head separately in my other hand. For me this works well.
Black Rapid straps attach to the camera by using a fastener which screws into the tripod plate socket on the bottom of the camera. Consequently, to accommodate the strap, the tripod plate needs to be removed from the camera. Then to use the tripod, the fastener needs to be removed. This is most inconvenient. However, the difficulty may be overcome by attaching a quick release clamp (Kirk) to the Black Rapid screw fastener. The tripod plate is then left on the camera permanently and the strap is attached to the camera tripod plate via the quick release clamp. In addition, the Black Rapid strap may also be attached to the lens, as well as the camera. The picture below shows this arrangement.
The following picture shows shows the details of the arrangement. The carabiner attaches to the black circular screw fastener which then screws into the quick release plate. The quick release plate attaches to the tripod plate on the camera base. The male clip attaches to a female counterpart which is fixed to the lens.
For me, this method is more portable and more comfortable than my previous arrangement of carrying the rig on my shoulder. A further benefit is that when I’m in a wildlife hide with the lens resting on a window ledge the strap is around my neck and secures the outfit without causing restriction.


Wireless Connections
Many of us will have seen television football games with a row of cameras lined up behind each of the goals. The cameras are equipped with wide angle lenses to record the action across the full width of the goal areas. The cameras are also fitted with a wireless file transmitter so that the photographer in charge of the camera can press the shutter and control all the camera settings from a remote location using a laptop, tablet or phone. And as the photographs are taken, the image files are sent via a Wi-Fi network from the camera to the photographer and usually to a remote computer on a press editor’s desk so that the pictures are available for publication immediately.
This technology provides wonderful opportunities for wildlife photographers. It is possible to photograph animals wild and free and in their natural habitat with the camera located close to the animals and the photographer controlling it from a temporary hide or similar structure. There is no human disturbance to the wildlife. The camera is controlled from the computer (laptop, tablet or phone) and all of the relevant parameters such as shutter speed, aperture, ISO, focus etc can be altered via the computer.
Some years ago I set up a project to use this technology to photograph large flocks of birds as they roosted. The camera was submerged in the ground and disguised with camouflaged scrim before the birds arrived. By the time they came to the roost I was equipped with a networked laptop and located in a hide about eighty metres away from the camera. I really enjoyed that project and learned a lot.
Wireless Connections Between Camera And Computer
In order for the camera and the computer to communicate with each other it is necessary to set up a Wi-Fi network to which both can connect. There are two different types of network which can be used: these are called infrastructure and ad hoc networks.
Ad Hoc Network
An ad hoc network connects the camera directly to the computer through a local network created by the computer. Most DSLR cameras have menu settings to enable an ad hoc local network. For the ad hoc network to function, the camera and the computer need to be in close proximity (a few metres) and the appropriate software from the camera manufacturer needs to be installed on the computer.
For example, to connect my current (September 2018) Canon camera to a computer via an ad hoc network I need to access the Menu:
Menu > Communication Settings > Enable > Network Settings > ConnectionSettings EOSUtility > Connection Wizard > Wireless > Select a Network > Camera Access Mode Point > Easy Connection >
Then on the computer, I select the camera name from the list of available wireless networks. This generates a dialogue box which requests a password (Encryption Key) which is shown in the camera window. When the password is typed into the computer the camera enables Pairing Devices and asks that the EOS Utility Software is started on the computer. Then to control the camera remotely by the computer I access the main page on the Canon EOS Utility software and select the EOS Utility Remote Shooting section. The camera and the laptop can now communicate and I can take pictures, receive the resulting images and control all the camera settings from the laptop. However, an ad hoc network connection is limited to 11Mbps and therefore slow. And because it requires close proximity between the camera and the laptop, it has in my view somewhat limited use for wildlife photography.
Infrastructure Network
An infrastructure network connects the camera and computer together via a wireless router. We routinely use wireless routers at home to distribute the signal from our internet provider to our computers and other wireless devices. DSLR cameras are able to communicate with wireless routers. When the camera joins the local Wi-Fi network image files may be sent directly from the camera to a computer on the same network and, if the network is connected to the internet, it can be sent to other computers located anywhere in the world.
To use this system in the field, away from any mains electricity supply the wireless router needs to be powered by a battery source (usually 12V, 1.5A). For this purpose I use a rechargeable Powergorrila battery (Lithium Polymer, 24000mAh, 88Wh) which provides electricity at 5V, 12V, 16V, 19V or 24V. It has numerous connectors and it charges a wide range of devices. Even though the wireless router is isolated and not connected to the internet, it will emit its own wireless signal which will be detected by both the camera and the computer. This creates a local area network (LAN) which can be joined by both the camera and the computer. This enables the camera and the computer to communicate with each other through the router. Indoors, wireless routers transmit over a range of up to 50m but outside without obstructions the maximum range is about 100m.
Some DSLRs cameras have an internal wireless file transmitter (WFT) fitted by the manufacturer (eg Canon EOS 6D) and Canon also has a Wi-Fi adapter which is inserted into the SD card slot of some cameras to enable wireless capabilities. Other cameras use an external WFT device which attaches to the camera. The range of the WFT is usually about 100m.
In the field the wireless router, along with its battery source, is best placed in between the camera/WFT and the laptop. Thus the distance from camera to router is c100m and the distance from the router to the computer is c100m, giving a total working distance from camera to laptop of about 200m. The connection speed is usually up to 300Mbps.
Once the router is powered up by the battery source it will begin to transmit a Wi-Fi signal. Use your camera menu (with Canon usually under Communication Setting) to join the router network. The router has a name/SSID (service Set Identifier) and a password and both of these are usually identified by the manufacturer on the router label. You will need to input this information into both your camera and your computer to enable each to join the router’s local network.
Normally after setting up your network it will not be possible to have access to the camera or router without disturbing the wildlife. Consequently, it is advisable to ensure that:
the camera that Auto power Off is set to Disable otherwise the camera will turn itself off and be removed from the local area network
the computer is prevented from going to sleep
the computer firewall is turned off.
set up the network connections between the camera and computer close to the wireless router (all three devices within a few metres of each other).
Many DSLRs allow the recording of two separate image files for each photograph. If your camera has such a facility then it is advisable to record your images in raw or large JPEG format and also to record the images as small jpeg files so that the sJPEG can be transmitted quickly and will be available on your computer screen immediately after you take the photograph via your computer. You can then review your images on the computer and make any necessary adjustments to the camera settings via the computer.
The photograph displayed below shows a Canon camera with an attached WFT, a laptop and a router powered by an attached Powergorilla battery for wireless file transmission using an infrastructure network.
Since that initial bird roost project I have used wireless technology in a variety of places including indoors at home while photographing the activity around the bird feeders in the back garden; great fun!

JPEG or Raw Images?
With many cameras you can choose to take photographs as a JPEG (Joint Photographic Expert Group) or as a raw image. Which to choose?
As well as the camera shutter speed, the ISO and the lens aperture, which together determine the exposure, other factors which affect the resulting photograph include contrast, colour saturation and colour hue as well as the degree of sharpening and the white balance (eg daylight, cloudy, shade, flash etc). The choice, JPEG or raw, will determine how these variables are managed.
Digital cameras record the image on the camera sensor. The resulting digital file is a raw file and it contains all of the data captured by the camera during the exposure. It is a greyscale image file which has embedded colour information to enable raw converter software to change the file to a colour image. The initial raw image is dark, lacks contrast and it is not sharp when compared to film. It is a digital negative which needs to be developed. If you choose JPEG, the digital raw file is developed internally by the camera’s own raw converter software. The JPEG file is then copied to your camera’s image card. Alternatively, if you choose raw, the file is copied to the image card as the basic raw file to be developed by you subsequently in a computer: in addition, a small JPEG file is also presented on your camera screen to enable you to see an example of the image.
Choosing JPEG
JPEG is a good choice if you require your images to have small file sizes.
JPEG images are automatically compressed by the camera’s computer to reduce the overall file size. With JPEG images all of the choices outlined above (contrast, colour etc) are locked into the image when the shutter is pressed and it is difficult subsequently to change them. You choose the degree of compression and it is not uncommon for the majority of the raw image data to be lost through this process. As the degree of compression is increased the quality of the file decreases but even at five per cent of its original size a JPEG file may still be of sufficient quality for its required purpose.
What is JPEG compression? It is the removal of data which are deemed to be surplus to requirements. For example, if a significant area of the image has a similar colour, such as in a blue sky, then instead of recording the full range of RGB colour data for each of the relevant pixels, that data will be reduced to a single value. It is just this compressed information that is then transferred from the camera sensor to the camera card and the rest of the data are discarded. This compression is “lossy” and the data in question cannot subsequently be recovered.
It is worth noting that with some file formats, for example with TIFF images (Tagged Image File Format), file compression is “lossless” in that the whole file is shrunk but no data are discarded and the compressed data can subsequently be recovered by restoring the file to its original size.
The fact that the JPEG file is reduced in size has significant advantages:
a limiting factor when using high speed shooting, with many frames per second, is that the camera’s buffer is rapidly filled and the sensor then stops recording images while the buffer offloads its data to the camera card. However, with small JPEG files the camera is able to accommodate an increased number of images before the buffer is filled
an increased number of images can be recorded on to the camera’s image card
the small size of a compressed JPEG file enables the image to be transmitted rapidly and easily over the internet. This is often important, for example in sending sports pictures to editors for publication in daily newspapers. Decisions have already been made in camera about colour, sharpness etc so the images are immediately available for editorial use without the need for any further development
JPEG images are readable by a wide range of hardware devices such as printers and scanners.
Disadvantages of JPEG include:
permanent loss of data
JPEG is restricted to files with 8-bit data (2 to the power of 8 which gives 256 levels of variation) but modern cameras record data at 14-bit (2 to the power of 14 which gives 16,384 levels of variation) and this extra information is discarded, significantly reducing quality
unlike TIFFs, JPEG format is not compatible with the development of layered images and, in the computer, layers must be compressed before saving an image as a JPEG.
Choosing raw
Raw is a good choice if you want the highest possible quality from the data captured by your camera, especially if you intend to print the photograph. All of the data recorded on the camera’s sensor are copied to the camera’s card. None of the information is discarded. However, high quality data files are accompanied by large file sizes so that hard drives are filled up rapidly!
Once the raw file has been downloaded from the camera card to the hard drive, all of the parameters associated with the image, such as contrast, colour saturation and hue, sharpening and noise, picture style and white balance, as well as the image exposure, can be adjusted on the computer. This is highly significant when quality is paramount.
With raw files:
the photographer has extensive creative control. The photographer develops the image rather than the image being developed by the camera’s in-built algorithms
14-bit data can be used to determine parameters such as the image illumination levels and colour spectrum
white balance, which makes a substantial difference to the image, may be altered / fine-tuned in the computer
colour space may be selected variously depending on the image output, for example sRGB for screen output and Adobe RGB for print
changes made to the raw file during development are saved as additional information to the raw data so that development of the image does not include any data loss from the raw file
the raw file remains intact and is available for later redevelopment, for example with new software.
Disadvantages of raw include:
file sizes are substantially larger than the size of compressed JPEG files
large files quickly fill the camera buffer and card as well as computer hard drives
the photographs are not immediately ready and need to be developed via a computer using a raw converter programme such as Capture One, Lightroom or Photoshop
skills to use raw converter software need to be acquired
whereas JPEG files are generic, raw files are proprietary with respect to the camera manufacturer. To make raw files generic they need first to be converted to DNG format (Adobe: digital negative).
Both Raw and JPEG
Some cameras provide two card slots and it is then possible to record photographs as both a raw file and a JPEG file. This enables the immediate file transfer of the JPEG over the internet along with the opportunity subsequently to develop the raw file to personal taste,
A Day in Norfolk
Last Thursday I had a day in Norfolk; an early start at 4.15am arriving at the Snettisham RSPB nature reserve two and a half hours later. The high tide, one of the biggest of the year at 7.4 metres, was scheduled for 9.26am. There is a walk of over a mile from the car park to the Wader Point on the reserve and that’s a long way with almost 20kg of camera gear! It’s good to be at the Wader Point ready for action two hours before high water.
As the tide floods it continually flushes hundreds of thousands of wading birds off their feeding grounds over the huge expansion of exposed mud in The Wash on the east coast of England. The height of the tide varies each day and it is only with the biggest tides that the sea completely covers all the mud and flushes all the waders. At Snettisham the tide needs to be a minimum of 6.8m high. Consequently it is important to consult an appropriate tide table to ensure that your visit is coincident with a suitably sized tide.
Snettisham contains a number of man made lagoons very close to the beach and over the high tide period the birds roost on the shingle banks of these shallow lakes. They leave a few hours later when the tide starts to ebb and again reveals the mud which contains the rich selection of marine life such as molluscs and worms on which they feed. Knots and oystercatchers are present in the greatest numbers accompanied by godwits, cormorants, little egrets, greylag geese, shelduck and a wide variety of other waders.
I like to spend half an hour or so at the Wader Point taking photographs of the birds as they gather into enormous flocks flying over the beach, occasionally harassed by a peregrine or marsh harrier, before I head for the hide at the end of the lagoon to watch the birds at roost.
Birds of a feather flock together and the knots accumulate in massive numbers with tens of thousands of birds flying over the beach and then squeezing onto relatively small patches of shingle (estimated at about 700 birds per square metre) to roost, cheek by jowl. The oystercatchers too arrive en masse but many of the other birds such as the little egrets, which also roost together on the shingle banks, arrive singly to join their fellows. Others, such as the greylag geese shown below, arrive in great noisy skeins. The oystercatchers roost in very large numbers and together look most impressive with their carrot-like beaks. They move continually with much commotion as the video below displays.
From time to time the birds are spooked by a raptor and take to the air en masse. On Thursday a hobby flew over the lagoon and the flock of oystercatchers lifted off from the shingle in great panic, returning to their roost once the hobby had departed. It is a terrific experience with the shrill calls of the birds in the cool morning air echoing over the water. The sights of tens of thousands of birds flying in unison is spectacular. Snettisham is a wild and special place and what particularly attracts me is that I am never quite sure what I might see there. On Thursday there were spoonbills on the shingle. And while I was in the hide taking pictures of the birds, on the nearby shingle a hare raced by and stoats are frequent visitors. Species such as the snowy owl, hen harrier and Montagu’s harrier have all been seen here in the recent past and barn owls and short eared owls are not uncommon, It is a place of which I never tire.
After the long walk back to the car park, stopping frequently to eat the numerous blackberries on the brambles which line the path, I headed off to find a late breakfast. Later, I visited some of the many excellent nearby wildlife sites along the north Norfolk coast, east of Hunstanton, and enjoyed a few hours sitting in the hides. I also found a tractor tilling the fields near Chosely Barns, followed by a number of black-headed gulls. It was a good end to a most enjoyable morning.


Oystercatchers roosting during high tide at Snettisham
A Tawny Owl
A good friend of mine has a wild and free tawny owl on his patch. Tawnies are very territorial creatures and their areas are often quite small. In its search for an endless supply of mice, rats, voles and earthworms this particular tawny is a frequent visitor to my friend's property. The bird comes regularly to visit an old farm fence post, to perch and silently to listen, before again taking to the air to continue the hunt. I was really delighted when my friend asked if I would wish to take photographs.
Tawnies rarely, if ever, hunt during the daylight hours and so, as the sun started to set and with great anticipation, I assembled my camera gear before sitting in a small canvas hide close to the perch. My gear consisted of a Canon 1DX MkII camera with a 70-200mm f2.8 L IS lens on a Gitzo tripod, along with two off-camera Canon Speedlite (600EX-RT) flashguns. The flashes were triggered by an on-camera Canon Speedlite (ST-E3-RT) transmitter set to high speed synch flash with the camera at F8, 1/640 sec and 400 ISO. In my experience, this Canon flash system works really well and it is highly reliable; well worth the investment. I settled down for the wait.
About an hour after sunset I heard an owl hooting in nearby trees, twowitawoo, towitawoo, and I hoped I would not have long to wait. Silently and seemingly from nowhere the owl materialised out of the darkness. Wings spread it drifted elegantly into view gliding slowly toward the old farm post. And with a slight realignment of its wings, the bird's talons came forward and it settled noiselessly on the perch.
As the owl landed on the post I pressed the shutter. I had half expected that as a result of the flash the bird might immediately take to the air. But no; it looked in my direction with a wise old gaze, folded its dark brown wings and settled down on the farm post. It stayed a while, occasionally turning its head as owls do with its black eyes searching the ground; and listening. I took another couple of shots and then the owl was up and away disappearing into the night as silently as it came.

Fine Art Paper Photo
The Permanence of Paper
Top quality photo paper is often described as archival paper which relates to the estimated longevity of the photographs printed on that paper. However, the permanence of the final photograph will depend not only the the photo paper but also on the ink used to print the photograph as well as the environmental factors such as light, temperature and humidity to which the picture will be exposed.
Paper manufacturers do not guarantee the longevity of prints made using their photographic papers but they do provide estimates of longevity based upon the tests carried out by independent research laboratories using internationally agreed controlled conditions. For example, Epson estimates that its high quality Traditional Photo Paper used with Epson Ultrachrome K3 inks will last for 90 years with colour prints.
The Colour of White
Over time ordinary white paper becomes yellowish in colour and deteriorates. This is caused by lignin which is a structural component in the cell walls of the wood used to make paper pulp. Lignin is removed during the manufacturing process of archival fine art papers so that over the archival period the paper will not change colour or become yellow. Chlorine and acids are also removed from the pulp so that the structure and integrity of the fine art papers remains robust and does not deteriorate over the specified archival time.
Bright, white photo paper is required in order to obtain high contrast photographs with a wide range of colours. In addition, the brightness of the paper has a significant impact on the way in which the highlights in the image will be expressed. For example, the highlights will look different on very white paper compared to paper which is creamy in colour. In order to a obtain a bright white product the paper is usually bleached during the manufacturing process and optical brightening agents (OBAs) are added to ensure that the whitest whites in the image may be produced in the print. OBAs interact with UV light and fluoresce to emit visible light with a slight bluish tinge. This gives the paper a very bright white appearance. However, excessive use of OBAs may compromise the permanence of the paper and if the subject of the image does not require the brightest whites OBAs may not be necessary.
Photo papers have a coating on the surface placed above the base layer. During the printing process this coating rapidly absorbs the inks which then dry quickly. This prevents the inks from bleeding excessively such that the original sharpness of the image is sustained in the photograph. Some fine art papers have a baryta layer applied to the surface. This is a barium sulphate coating (from barite which is a natural substance like clay). Baryta papers are fibre based and made from materials such as cotton or linen rag (as against cellulose from wood) and rag papers are expensive. The baryta layer supports a very high definition and tonal range in the print and also makes the paper bright and smooth. Usually the baryta layer is used to add OBAs to enhance whiteness. A baryta layer provides the basis for very deep blacks and against the whiteness of the paper this ensures great contrast. They are particular popular for black & white photographs.
It is worth noting that glass interferes with the transmission of UV light and therefore when the fine art print is mounted and framed behind glass the effect of OBAs will be nullified.
The Colour of Black
The colour of black is critical to an image. If the deepest blacks in the image are insufficiently dark then the photograph will look weak and washed out. Consequently the depth of the black that can be printed on the photo paper is an important parameter. It is measured by Dmax which is a measure (negative log to the base 10) of light reflection by the deepest black that the printer can produce using specified inks on the photo paper in question. Gloss papers usually have a high Dmax with a value up to about 2.5 whereas matte papers have a Dmax of about 1.7.
The Weight of Paper
The weight of the paper is also of importance in that weight provides rigidity to the photograph and enhances its feel. It is measured in grammes per square metre (gsm). Ordinary paper is usually about 100gsm and fine art papers range from about 230gsm to over 350gsm. Heavy paper is usually thick paper and, whereas ordinary paper is about 0.2mm thick, fine art photo paper may be 0.5mm or more. However, not all printers are capable of accommodating such thick papers and printers for fine art paper usually have an additional paper feed mechanism to load paper at the front or the back so that the paper can pass through the machine without being bent: these papers are often available only in sheets as against large rolls
The Surface of Paper
The choice of paper for your fine art print depends on a number of factors. Gloss paper has a very smooth surface whereas matte paper may either be smooth or have a structured surface which can add a small three dimensional perspective element to the picture surface. Sometimes the paper is neither gloss or matte, but rather in between the two and called lustre, satin or semi-gloss.
If the photograph contains numerous sharp edges with fine detail, their sharpness in the print will be best resolved by gloss paper whereas less focussed structures, as in landscapes for example, may be better represented on matte papers. Also gloss paper will have a greater tonal range than matte paper such that blacks will be deeper on gloss than on matte.
In photographs where the contrast and tonal range are of prime importance then perhaps gloss would be the paper of choice but if the image has a soft, ethereal perspective then on gloss paper it may appear too contrasty and matte paper might be more appropriate. However, the majority of images will look good on either gloss or matte fine art paper and paper selection is a matter of personal choice.
The Frame
Having purchased a fine art photograph it is advisable to preserve your investment by mounting it in an appropriate picture frame which suits the style of the location in which the print will hang. This will protect the photograph from dust and scratches as well as from UV light which is particular damaging to print permanence. Normal glass used in picture frames will block over seventy five per cent of UV light and a specialist picture framer will be able to provide you a museum-type glass which contains enhanced anti-reflection properties as well as blocking over ninety nine per cent of UV light. This will ensure your fine art print will be enjoyed for many years not only by you but also by future generations.
Fine Art Papers
There are many archival fine art papers from which to choose. However, the Hahnemuhle Fine Art Inkjet Papers, although expensive, are widely recognised as being excellent; Fine Art Baryta Satin and Photo Rag Ultra Smooth provide superb results and are personal favourites. Also, the Epson range of Signature Worthy Papers are impressive in sustaining brightness, colour and contrast in fine art prints.
Svalbard
Last month I visited Svalbard, a Norwegian archipelago located about half way between Norway and the Arctic Pole. Until 1925 it was called Spitsbergen and that is what the main island is now named. In winter the temperature is about minus twenty degrees celsius but over the summer months it rises above zero and the pack ice begins to melt; there is twenty four hour daylight. It is wild and beautiful, remote and desolate.
About two thousand people live in the town of Longyearbyen and elsewhere on Spitsbergen there is a small mining community at Barentsburg as well as a research station at Ny-Alesund. These are the most northerly human communities on earth.
I spent two weeks on board a Norwegian vessel called the Havsel. It is thirty three metres long with a steel hull and was built for the arctic pack ice. It accommodates twelve passengers and four crew. It carries two steel-hulled ice buster skiffs which can be lowered into the sea to enable access to the pack ice and to land on the islands. The boat was used by the BBC to film the programmes Frozen Planet and The Hunt.
We sailed from Longyearbyen and headed north to find polar bears. A picture of the Havsel is shown below with one of the photographers in the crow's nest on the lookout for bears.
The map of Svalbard below shows the route taken by the Havsel along with the locations where various wildlife species were photographed. The draft of the boat is three metres which ensures that it was able to pass through the Forlandsundet waterway, which separates Prins Karl Forland from Spitsbergen, before heading east. The pack ice soon appeared and along with it the polar bears.
We had over fifty encounter with polar bears, many of which were in the Wahlenberg Fjorden in the island of Nordaustlandet. They are very curious animals and showed absolutely no fear often coming to the side of the boat to see what was going on. The same bear might then be seen later in the day swimming in the ice flow.
They are very strong swimmers and are able to swim for many hours. They are also very agile as indicated in the photo below.
In addition to the bears, there were many encounters with bearded seals and walruses hauled out on the ice; and on the mountain foothills numerous arctic foxes and Svalbard reindeer.
There are many bird species in Svalbard such as kittiwakes, brunnichs guillemots, arctic terns, glaucous gulls and the beautiful ivory gulls. It was wonderful to photograph them against backgrounds of glaciers and blue ice.
I hope to be back in Svalbard before too long!


Printing Images
“The philosophy set forth in these books is directed to the final expression of the photographer’s visualisation - the print.” Ansel Adams
The Ansel Adams Photography Series: Book 3 (1980) p1. Little, Brown and Company New York. ISBN 978-0-8212-1526-5-HC
__________________________________________________
I really enjoy printing my images and it’s great to hold in my hands the final result of my creative endeavours. In the analogue era, once the shot had been taken, apart from sending the film to be developed, the job was done. Today, the photographer is in charge of the whole process from pressing the shutter, reviewing the image on the camera, developing the digital image on a computer, and printing the picture. We have become image makers.
There are many challenges in producing top quality prints. And to ensure success, it is important that the complete printing work flow is carried out using icc profiles as defined by the International Color Consortium (established in 1993 by eight international companies including Adobe, Apple and Microsoft).
Profiling the computer monitor
It used to strike me as odd that in large electronic stores with many televisions showing exactly the same programme they would have widely differing pictures, some highly saturated with much contrast, others pallid in comparison; and most somewhere in between. TVs use composite video signals in which the colours have been mixed together; and they are then adjusted to individual taste by the viewer. Unlike TVs, computer monitors use three separate electron guns, one each for red, green and blue (RGB) to fire electrons at the monitor screen which generates a spectrum of colours.
To an image maker this is important because if computer monitors were to vary to the same degree as those TVs then an image on my monitor might look entirely different when it is displayed on your monitor. However, if both monitors have been profiled by comparing each to an appropriate icc standard then the image would look the same on both.
Profiling a computer monitor involves using a device (colorimeter or spectrophotometer) to measure variables such as the brightness of the monitor, the white point and the black point as well as the outputs of the red, blue and green colour guns. The device will also measure a number of grey points. (RGB icc colour spaces such as sRGB and Adobe (1998) RGB are balanced colour spaces in that when the R, G and B numerical values are identical the resulting colour is a grey: for example, RGB 0,0,0 is black; 60,60,60 is a dark grey; 128,128,128 is mid grey; 190,190,190 is a light grey; and 255,255,255 is white).
The colorimeter or spectrophotometer attaches to the computer usually by a USB cable. It is then placed on the front of the monitor so that the light emitted by the monitor can be measured. Common examples of such devices are X-Rite ColorMunki Display and the X-Rite i1 Display PRO (http://www.xritephoto.com/displaycalibration). Having measured the output from the monitor, the device then integrates with specialist calibration software in the computer to instruct you to make specific alterations to your monitor output so that it is profiled to become compatible with the icc standard. And now, when you look at the image on your icc profiled monitor, you will know that it appears as it would to others using their icc profiled monitors.
Profiling the printer
When you send a digital image file from your computer to your printer the data you send include the three RGB numbers of all the colours in the image. If your computer monitor has been suitably icc profiled you will be confident that the data being received by the printer represent accurately the true colours of your image as seen on your monitor.
But, how do you know that your printer will accurately print the colours received from your digital image file? You don’t know unless you profile your printer. The printer icc profile takes into account the specific paper, the ink and the printer that you are using.
Some papers are vey white and others perhaps a little off-white. Some papers absorb a lot of ink whereas others are less porous. Ink from one manufacturer will interact with the paper differently to the ink made by another. The printer needs to be informed about these various variables so that it can accurately reproduce the colours in the image file received from your computer.
An icc printer profile is obtained by first using your printer to print an image file with a wide range of different colours, usually arranged like a decorator’s colour chart, in which the relationships between the various colours and their three RGB numbers have been verified. So, for example, if a colour in the image chart has the verified RGB value of 19,25,31 (dark blue/green) your printer should provide the inks in suitable amounts to deliver that exact colour on that particular photo paper using that particular type of ink. However, it will only be able to achieve this objective if it has been already informed about the paper type (brightness, absorbency etc) and the ink type (Epson, Canon, non-OEM ink etc).
Initially, the print is made using your printer and the paper and ink of your choice in the knowledge that the printed colour will not be accurate. Having obtained the print it is then possible to use a spectrophotometer to measure the actual RGB numbers of the colours which have been printed onto your photo paper by your printer. It is most unlikely that your printer will lay down the correct amount of your chosen inks on your selected photo paper accurately to represent that dark blue/green colour (R19,G25,B31). However, the difference between the actual printed colour and the desired printed colour can now be evaluated using a spectrophotometer and used to generate some computer software which will tell the printer the adjustments it needs to make to achieve accurate colour using that specific paper and that specific ink.
Most photo paper manufacturers provide free generic icc profiles for their papers with respect to a wide range of ink/printer combinations. These icc profiles are pieces of computer software which can be downloaded from the manufacturer’s web site to your computer so that appropriate information is sent to the printer with the image file to inform the printer about how it should interpret the RGB data to obtain accurate colours. These generic icc profiles are usually sufficiently good to ensure faithful colour representation.
However, if for any reason you are unhappy with the paper manufacturer’s generic profile for your printer/ink combination, you can obtain a profile for a specific paper, a specific ink and your own personal printer. This process involves printing on your personal printer an image file which has been sent to you by the profiling company of your choice. The resulting print is then sent back to the company for analysis following which the company will send to you by email an appropriate piece of software to be installed in your computer so that your personal printer will print accurate colours with that specific paper and ink combination. This ensures an extremely accurate icc printer profile for that paper and ink. If you have access to an appropriate spectrophotometer (eg x-rite i1Studio) it is most rewarding to do this job yourself.
Comparing the monitor image with the printed picture
If both your computer monitor and your printer are appropriately icc profiled your printed image will look very similar to the image you see on your monitor: very similar, but not the same. There are inescapable, fundamental differences between the printed image and the projected image We see the image on the monitor via direct, projected light coming directly from the screen into our eyes and the colours are bright and vibrant. Monitor images benefit if viewed in a dark environment rather daylight. With respect to the print we see the image via indirect light where the light rays hitting the printed paper are reflected into our eyes. Printed images benefit from being viewed in full daylight rather than a dark environment. Because of these physical differences, compared to monitor images, printed images will always appear relatively flat and dull.
Computer programmes such as Capture One and Adobe Photoshop enable the monitor image to be ‘soft-proofed’ such that the computer emulates how the image will appear in print with a specific icc printer profile. When you soft-proof the image on your monitor be aware that your image will perforce become less punchy and less vibrant.
However, if your both computer monitor and printer have been properly icc profiled, when you pick up your picture after it has emerged from the printer and you hold it up to the daylight, it will compare very favourably with the soft-proofed image that you see on your computer monitor. You will have a product which will last for generations and that is very gratifying!
Comments
Any comments or questions you might have on this blog will be most welcome.